
the new model where:
* A good power to weight ratio: a small robot with a lot of degrees of freedom
* Fully automated calibration (I don't want to put it in a start position)
* Speed, both mechanical and software
* Strength, the robot must be able to walk
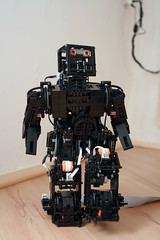
By using standard NXT motors I was able to reduce the number
of gears needed in the legs. The arms and body of the robot are
powered by power functions motors and micro motors.
The robot is fitted with 5 tilt sensors which are used to calibrate
the position of the motors in the legs. The motors in the arms use
friction gears and touch sensors to reset their position.
To control all functions of the robot three NXT bricks are used. One
brick controls six motors on the left side, one controls six motors on
the right side and one brick controls the COG shift and the head.
Bluetooth is used to communicate between the NXT bricks.
Once the hardware was finished I started programming the software.
The bricks which control the two sides of the robot each run a
state machine. The states are controlled from the master brick.
This makes it very easy to program. As long as the protocol
to communicate with the slaves does not change the slaves don´t
need to be updated, updating the master is all that is needed
to reprogram the robot.
The first routine I programmed was "standing". This might sound
strange but standing is actually a dynamic proces. The robot has
to respond to external forces like being pushed.
Just standing seems simple but it gave me some unexpected results.
When the input power of the motors was not set right the motors
started to resonate and the robot crashed.
After the standing routine was completed I extended the functionality
by programming a routine to lift the legs. The stabilization of the
legs is done with tilt sensors.
To fix the motor overshoot I implemented PID controllers. Programming a PID
controller is easy, tuning it is a different story, I am still working
on it.
Here's a video of some guys who already fixed it:


No comments:
Post a Comment